This auto body & auto glass repair blog was created to allow users to share tips and tricks about auto body repair, collision repair & auto glass repair.
Did you just crack or chip your windshield and now you are wondering whether you can fix your windshield yourself? Well, you will be pleased to know that most cracks and chips in your windshield are repairable. Here you will learn about the different types of windshield cracks and chips that are repairable.
With a couple DIY guides on how to fix a cracked windshield, you will have a fancy new windshield in no time for less than $15 bucks. The best way to fix a cracked windshield is to use epoxy or acrylic adhesives aka Do it yourself Windshield Repair kits. These windshield repair kits fill in the small windshield chip with an adhesive that turns clear when dry.
What happens if I wait to long to repair my windshield crack? Not fixing your chipped windshield early enough will leave it with spider cracks that are irreparable. If you have spider cracks, you are going to need to replace your windshield or get a ticket for driving with a cracked windshield.
Impairing a drivers view with a cracked windshield is illegal in almost all states and very dangerouse to you or your passengers. Weather damage will cause the cracks or chips to widen leaving you and your passengers in the exact same situation.
What size windshield chips and cracks are repairable?
Windshield chips or cracks that are 1" to 3" in diameter, or no longer than a $1 bill, can be repaired. Windshield chips or cracks that are longer than 3" in diameter, or longer than a dollar bill, cannot be repaired.
What are the different types of chips and cracks? The different types of chips and cracks are Bull's Eyes, Combination Breaks, Chips, Crack Chips, Edge Cracks, Dings, Float Cracks, Longs, Cracks, Half Moons, Stress Cracks, Partial Bulls-Eyes, Star Breaks, Pits, and Stone Breaks.
Type of Windshield Chips & Cracks That Cannot Be Repaired
Here are the different types of windshield damage that cannot be fixed. If you have any of these types of windshield damage, you are going to need to hire a professional.
Chips or cracks on the interior part of the windshield
Damage that goes through all layers of the auto glass
Looking for Do-It-Yourself cracked windshield repair methods on how to fix a cracked windshield? Here you can learn how to repair cracked or chipped windshield damage using Permatex's or Rain x's windshield repair kits, (best windshield repair kits on the market), without taking your car to an windshield repair shop.
Performing your own windshield crack repairs can save you tons of time and money. If your windshield is mostly in good condition, but still has a small crack or chip, you should get it repaired as soon as possible to avoid more windshield damage.
The Danger Of Small Windshield Chips & Cracks
Small windshield chips and cracks can turn into much bigger cracks if left not repaired soon enough. The next steps for your will be windshield replacement, filing auto glass claims, and paying a deductible to your auto insurance company.
How much does it cost to replace your windshield with auto glass companies? Depending on your auto glass coverage, you could pay as much as a $500 deductible to replace your windshield.
How much do I have to pay to replace my windshield if I have auto glass insurance? If you have auto glass insurance in states like Arizona, you get get your windshield replaced for FREE.
Types of Windshield Cracks and Chips That Can Be Fixed
Before you get too worked up, take a really close look at your windshield chip with a magnifying glass. You may be able to repair the windshield crack instead of replacing the windshield entirely. Take a look at the chart above that shows you the all of the different types of windshield chips and cracks that can be repaired without windshield replacement. The most common way to repair a cracked windshield is to use acrylic or epoxy adhesives also known as DIY windshield repair kits, that to fill in the small windshield chip or crack with a clear when dry adhesive.
What happens if you don’t repair your windshield crack soon enough? Failure to repair your windshield chips in the early stages can leave your windshield with long spider cracks that cannot be repaired. You will need to replace the entire windshield or face receiving a ticket for driving with a cracked windshield. Driving with a cracked windshield that impairs the drivers view is illegal in most states and dangerous to your safety. Also, weather damage can make the crack or chip more severe leaving you in the exact same scenario.
What size windshield chips and cracks are repairable?
Windshield chips or cracks that are 1" to 3" in diameter, or no longer than a $1 bill, can be repaired. Windshield chips or cracks that are longer than 3" in diameter, or longer than a dollar bill, cannot be repaired.
What are the different types of chips and cracks? The different types of chips and cracks are Bull's Eyes, Combination Breaks, Chips, Crack Chips, Edge Cracks, Dings, Float Cracks, Longs, Cracks, Half Moons, Stress Cracks, Partial Bulls-Eyes, Star Breaks, Pits, and Stone Breaks.
Type of Windshield Chips & Cracks That Cannot Be Repaired
Here are the different types of windshield damage that cannot be fixed. If you have any of these types of windshield damage, you are going to need to hire a professional.
Chips or cracks on the interior part of the windshield
Damage that goes through all layers of the auto glass
Repairing cracked windshield costs can be expensive if you don't know where to look. Repairing a crack using an auto glass repair shop will cost you upwards of $10-$150, depending on the length of the crack. Repairing a small chip in a windshield using an auto glass repair shop would typically costs $10-$60, depending on location and whether the work is done in a auto glass repair shop or if it's a mobile auto glass repair service. Mobile glass repair services will cost more because they are spending money on gas, travel time, etc. And, If there is more than one crack, it's going to cost you an extra $10-$25 per crack. Well, lucky for you, I'm going to show you how to do this DIY windshield repair at home, for less than $15 dollars!
The DIY windshield chip repair kits on the market will have some flaws prior to application. The DIY kits aren't a perfect fix but they will at least save your windshield from further damage and keep you from getting a ticket.
Required Tools For This Windshield Repair Job
RainX Fix a Windshield Do it Yourself Windshield Repair Kit, for Chips, Cracks, Bulll's-Eyes and Stars (Cost $14.99 on Amazon) (Cost $10.97 at Walmart)
Stanley 28-100 1-3/16-inch High Visibility Mini-Razor Blade Scraper: (Cost $3.99 on Amazon) (Cost $3.99 on Walmart)
red-Star Fix your Windshield Do It Yourself Windshield Repair Kit, Made in USA (Cost $8.16 on Amazon) (Not Available At Walmart. Follow the steps in the repair guide below to get started.
How To Use RainX Windshield Repair Kit to Fix Chips, Bull's Eyes & Stars - Step By Step DIY Guide
Step 1. Remove the tiny fragments with your Stanley 28-100 Mini-razor blade scraper by scraping over the windshield. Make sure the suction cups are securely fastened to the windshield with the center ring directly above the chip or crack. Make sure that the suction cups are not covering and chips or cracks. You can adjust the suction cups if you need to.
Step 2. Screw the resin collector into the center ring. You can still adjust the center ring by moving the suction cups into a better position. Go inside the car and make sure the resin collector is directly centered in the middle of the crack. Now screw the resin collector all the way to down to be flush with the windshield. Make sure it is touching but is not too tight. Tightening too much could cause more damage may disalign the collector.
Step 3. Squeeze out about 4-6 drops of the resin (Could be more or less depending on the size of your crack or chip) into the collector. If resin starts to leak out gently turn the collector clockwise in order to stop leakage.
Step 4. Screw the pressure tube into the resin collector clockwise (remember that old saying "righty tighty, lefty loosy") to push the resin into the crack or chip. Keep tightening until the pressure tube is all the way screwed in but not too tight. Check from the inside of the car again to make sure that the resin collector opened up all the way. You should see where all the resin has entered the crack. Make sure that it reached all areas of the crack. If it didn't, use a hair dryer or heat gun to heat up the windshield and make sure the resin seeps in to all areas. Don't use too much heat though. It could cause more damage and take a lot longer to repair. Turn the resin collector all the way in to make sure all the resin has been used. Wait about 5-10 minutes before applying heat after the original application.
Step 5. Remove the pressure tube by unscrewing it to release any air caught in the collector. Now, put the pressure tube back in to remove any air that still is remaining from the break. Look at the glass from multiple angles to find air bubbles that are still caught in the crack. If there is any areas that were not covered by the resin repeat steps 4 and 5 until you receive the desired results.
Step 6. After you remove all the air turn the resin collector and the pressure tube counter clockwise 1/2 turn (to the left). Remove the entire device by lifting up on the suction cups. Clean up any resin that still remains on the collector so it doesn't drip back down on the windshield. Add resin in to any areas that still need fixing and use the curing strips to finish it off. Don't press the strips down too hard, no pressure is need, just lay them gently flush with the windshield.
Step 7. After you are done applying the resin, put the car directly in sun light to dry. Should take about 5 or 10 minutes. After the resin is dry remove the strips. Use your Stanley 28-100 1-3/16-inch razor blade to remove any excess resin scraping at a 90 degree angle until all the excess resin is removed. If there are any areas that got missed repeat steps 6 and 7.
How To Use RainX Windshield Repair Kit to Fix Cracks - Step By Step DIY Guide
Step 1. The resin collector, pressure tube and suction cups are not needed for this fix so just break out your resin dispensor and lets get to work. Very slowly drip resin into the cracked area on your windshield. Dispense the resin extremely slowly (meaing about a drop every 3 seconds). Now, step back and look at the crack from multiple angles to see dark areas filling with the resin. Wait about 5 or 10 minutes and see if there are any air bubbles left in the crack. If there are, apply pressure to the inside of the windshield until all the bubbles are gone. Be carefull though you don't want to make the crack worse. Keep applying more resin and repeating this step until the crack is completely filled and contains no air bubbles.
Step 2. After you completed step 1 reapply more resin the crack while placing your curing strips on top of the crack while leaving no air under them. Once again, do not apply pressure to the strips just make sure they are completely covering the crack. Use your Stanley 28-100 1-3/16-inch razor blade to remove any excess resin scraping at a 90 degree angle until all the excess resin is removed.
Step 3. After you are done applying the resin, curing strips and removing the excess resin, put the car directly in sun light to dry. Should take about 5 or 10 minutes. After the resin is dry remove the strips. Use your Stanley 28-100 1-3/16-inch razor blade to remove any excess resin scraping at a 90 degree angle until all the excess resin is removed. If there are any areas that got missed repeat steps 6 and 7.
How To Repair A Cracked Windshield Using Bug Spray, Salt and Rubbing Alcohol?
Their have been myths that you can use bug spray, salt, and rubbing alcohol for cracked windshield repair. However, the video below shows that this method does not work and you should purchase professional how to fix a cracked windshield products.
How To Fix A Chipped Windshield Using Permatex Windshield Repair Kit
DIY Windshield Chip Repair. This is a how to fix a chip in a windshield using Permatex chipped windshield repair kit. DIY windshield chip repair kit from Permatex helps keep your chips from turning into cracks overnight! It’s easy to do and only costs around $10 on Amazon. A windshield repair shop would easily charge you $500 for this type of repair so save yourself some time and money and learn the DIY way to fix chipped windshields.
Here is where Chris bought the Windshield Repair Kit
Permatex Windshield Repair Kit on Amazon
Here was a different video showing a different windshield repair kit
https://youtu.be/YK1kpSZpMPM?list=PLDD611CFB36FC65F2
How To Use RainX DIY Windshield Repair Kit To Repair Cracks Yourself (VIDEO STEP BY STEP)
Using toothpaste for headlight restoration. Learn how to clean headlights with toothpaste and restore yellow headlights so they are clear again. Headlight lens restoration using regular toothpaste actually works. It doesn't take much effort, and you can get great results. Watch to see how to get your ugly headlights clear again!
In this headlight restoration video you will see Chris the car guy using toothpaste to restore his headlights back to new again using toothpaste, water, paper towels, car wax, and good ol fashioned elbow grease. I took his original video and cut it down to 1 min to make it super short and easy to follow.
Headlight Restoration Using Toothpaste Video
See his original headlight restoration video here:
Headlight Restoration using Toothpaste 3:40
8,253,551 views 55,000+ likes
Materials you are going to need for this headlight restoration project
1. Colgate toothpaste with baking soda & peroxide
2. Toothbrush
3. Spray bottle with water (or a bucket of water lol)
4. Paper towels
5. Meguiar's G18211 Ultimate Paste Wax - 11 oz.
Step By Step How To Restore Headlights Using Toothpaste
Step 1. Rub the toothpaste all over the headlight evenly
Step 2. Scrub the toothpaste in with a toothbrush
Step 3. Use a spray bottle of water to spray onto the toothpaste
Step 4. Wipe off the toothpaste and water with a paper towel
Step 5. Use Meguiar's Paste wax to spread all over the headlight
Step 6. Wipe excess wax off of the headlight
Step 7. Stare at your shiny new headlight from multiple angles
Here are the Postmates Promo Codes for Phoenix Arizona. The Postmates Promo codes are also good for Mesa Arizona, Scottsdale Arizona, and Tempe Arizona.
Postmates Promo Code Phoenix:
Try Postmates and get the best of your Phoenix delivered in minutes! Use my personal referral code, 5px3t. Save on your first free delivery (up to $10) off your first order.
Postmates Promo Code Not First Time Phoenix Arizona
W3JKC
Postmates Driver Promo Code Phoenix Arizona
rideshareapps@gmail.com
Are you supposed to tip on Postmates?
If you are getting the delivery for free you should at least tip the driver. 10% is the recommended tip for take out or delivery costs. A full-service waiter would typically receive 15-18% and they serve you the whole meal. Think about it, the delivery driver is simply handing over your food and that's it.
Welcome to our Auto Glass Repair Blog. We scoured the internet to find passeneger window replacement costs for every type of vehicle on the planet including Cars, Trucks, Vans, SUVs, and RV's.
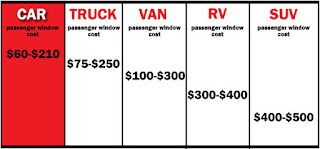
Passenger Window Replacement Costs Guide 2016
Car passenger window replacement cost
We took the cost from replacing Mitsubishi, Chevy, Nissan, Toyota, Honda, Acura, Ford, Dodge, VW, BMW, and Mercedes Benz passenger windows and came up with an average cost of passenger window replacement.
The cost to replace a car's passenger window is $60-$210 on average in 2016, depending on the type of vehicle you drive.
Luxury car passenger side window replacement could cost you up to $410.
Truck passenger window replacement cost
We averaged the cost of replacing all of the different truck brands passenger windows including Chevy, Nissan, Toyota, Ford, Dodge, Honda, and GMC.
The cost to replace a trucks's passenger window is $75-$250 on average in 2016
RV passenger window replacement cost
We average cost from replacing all of the different brands of RV's passenger windows including Airstream, Chausson, Carlight, EarthRoamer, Hymer, Winnebago, Wonderlodge, and Triple E Recreational Vehicles.
The cost to replace a RV's passenger window is $300 on average in 2016. And, that's only the cost for replacing a single panel window. The cost to replace a Rv's two panel window is $350, and the cost to replace a T-slider window can be up to $400. RV windows are much more exensive than replacing car or truck windows.
Van passenger window replacement cost
The cost to replace a Van's passenger window is $100-$300 on average in 2016
We average cost from replacing all of the different Van brands passenger windows including Chrysler, Chevy, Nissan, Toyota, Ford, Dodge, Honda, and GMC.
SUV passenger window replacement cost
We average cost from replacing all of the different SUV brands passenger windows including Chevy, Nissan, Toyota, Ford, Dodge, Honda, AUDI, Buick, BMW, Cadillac, Daewoo, Infiti, Kia, Suzuki, Volvo, Jeep, and GMC.
The cost to replace a SUV's passenger window is $500 on average in 2016
We hope you enjoyed this passenger window replacement cost guide for 2016. Stay tuned for more from Auto Glass Repair Blog.